Perfect Portable Strawberry Crisp Bars for Any Gathering
Ever found yourself at a potluck, scanning the dessert table, only to see some treats disappear in minutes while others languish untouched? The secret to a crowd-pleasing dessert isn't always elaborate decorations or exotic ingredients; sometimes, it's about pure, unadulterated comfort combined with unmatched portability. Enter the ultimate strawberry crisp bars recipe – a golden, fruit-filled marvel that consistently vanishes first at every gathering. These irresistible bars capture all the beloved flavors of a warm strawberry crisp but in a convenient, hand-held format that's perfect for picnics, barbecues, or any impromptu get-together. They promise bakery-quality results from simple pantry staples, making summer comfort food both accessible and utterly delightful.
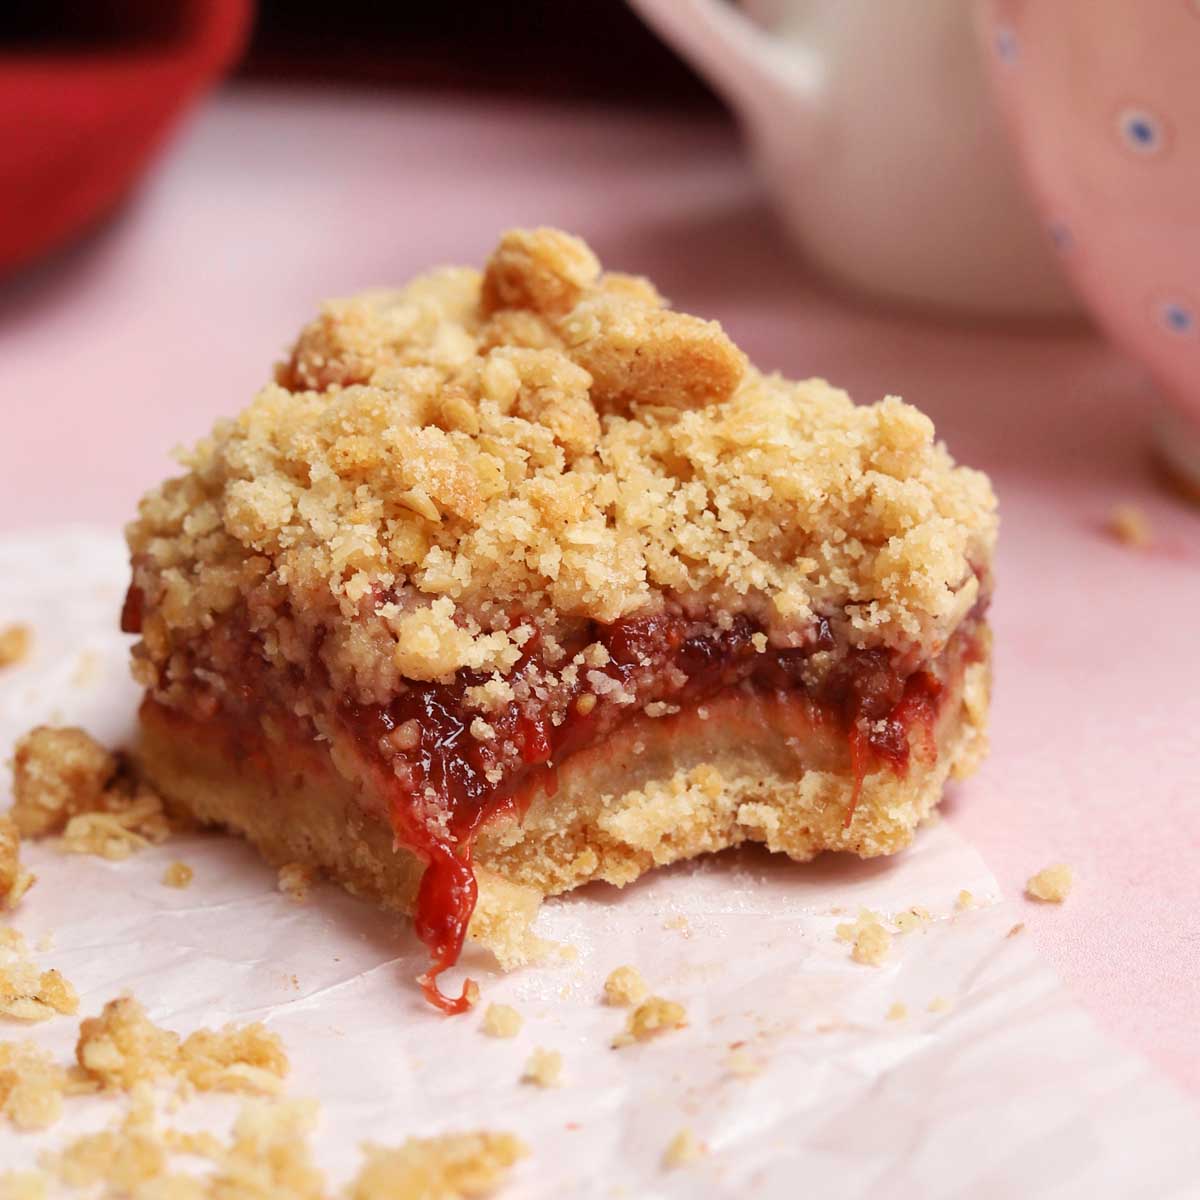
The Anatomy of a Perfect Portable Crisp Bar
What elevates a good fruit bar to an unforgettable one? The magic of these strawberry crisp bars lies in their ingenious structure. The secret is truly understanding the delicate balance between a sturdy base and a light, crumbly topping. Many bakers struggle with either a soggy bottom crust that can't support the juicy filling or a dry, crumbly topping that disintegrates at the slightest touch. This particular strawberry crisp bars recipe masterfully avoids these pitfalls by utilizing a single, versatile oat mixture that performs double duty:
- The Sturdy Foundation: Half of the buttery oat mixture is pressed firmly into the bottom of the pan, creating a robust crust that can withstand the moisture of the sweet strawberry filling. This firm foundation is key to ensuring your bars are truly portable and don't fall apart when sliced and served.
- The Golden, Textural Topping: The remaining oat mixture is generously sprinkled over the fruit, transforming into a golden, crispy crumble during baking. This provides a delightful textural contrast to the soft, bubbling strawberry center, making every bite a symphony of textures and flavors.
Achieving this ideal balance hinges on proper ratios of butter to dry ingredients. Too little butter, and your crust will be dry; too much, and it becomes greasy. The "press-and-sprinkle" technique, once mastered, guarantees a consistent, delicious result every time. It's this thoughtful design that transforms a beloved classic like strawberry crisp into a travel-friendly bar, perfect for sharing without the need for spoons or bowls.
Key Ingredients for Unforgettable Flavor & Texture
While the technique is crucial, the quality of your ingredients truly shines through in this simple yet elegant strawberry crisp bars recipe. Thoughtful selection ensures maximum flavor and the perfect texture:
- Fresh Strawberries: These are the undisputed stars of the show. Look for ripe, vibrant red berries that are still firm. Overly soft or mushy berries will break down too much during baking, potentially creating a watery filling. Dicing them uniformly, around ¼ inch, is also vital for even distribution and prevents isolated soggy spots. Pro Tip: Always grab a few extra strawberries. Not only are they perfect for snacking while you prep, but it also ensures you have enough picture-perfect pieces for your bars.
- Old-Fashioned Rolled Oats: This is a non-negotiable ingredient. Unlike instant oats, which quickly turn mushy during baking, old-fashioned rolled oats maintain their shape, providing that signature chewy texture in both the crust and the crumble topping. They are essential for the structural integrity and satisfying mouthfeel of the bars.
- Quality Butter: A good quality unsalted butter is paramount. It contributes immensely to the rich, golden hue and crispy texture of the oat crumble, infusing the bars with a delicious, nutty flavor that complements the strawberries beautifully. Melting it evenly and incorporating it fully into the dry ingredients is key to forming those perfect, moist clumps.
- Brown Sugar: While granulated sugar sweetens the strawberries, brown sugar plays a critical role in the oat mixture. Its molasses content adds depth, moisture, and wonderful caramel notes that perfectly harmonize with the bright, fruity flavor of the strawberries.
- Cornstarch: Often overlooked, cornstarch is your best friend in the strawberry filling. It acts as a powerful thickener, preventing a watery, runny mess and transforming the berry juices into a perfectly gel-like consistency that holds its shape when the bars are sliced. Don't skip this!
- All-Purpose Flour & Granulated Sugar: These provide structure to the crumble and sweetness to the fruit, ensuring a balanced flavor profile.
- Pinch of Salt: A tiny bit of salt in the crumble enhances all the other flavors, preventing the bars from tasting overly sweet and bringing out the best in the fruit and oats.
Mastering the Method: Step-by-Step for Success
Making these portable strawberry crisp bars is surprisingly straightforward, especially once you understand a few key steps that guarantee a flawless outcome. For an even deeper dive into achieving perfection, check out our guide on Bake Bakery-Quality Strawberry Crisp Bars: Expert Tips.
- Prepare Your Pan and Oven: Preheat your oven to 350°F (175°C). This ensures even baking from the moment your pan goes in. Line an 8x8-inch baking dish with parchment paper, leaving a generous overhang on two sides. This overhang is a game-changer; it acts as a sling, allowing you to lift the entire baked slab out of the pan effortlessly, making cutting and serving a breeze while minimizing cleanup.
- Craft the Strawberry Filling: Dice your fresh strawberries into small, uniform ¼-inch pieces. Consistency here is important for even cooking and distribution. In a medium bowl, gently toss the diced strawberries with granulated sugar and cornstarch until every berry is lightly coated. The cornstarch is critical; it activates with heat, thickening the natural juices and preventing a soupy filling.
- Assemble the Oat Crumble: In a separate large bowl, combine your dry crumble ingredients: old-fashioned rolled oats, all-purpose flour, brown sugar, and a pinch of salt. Stir these together thoroughly. Then, pour in your melted butter. Mix with a fork or your hands until the mixture forms moist, crumbly clumps that hold together when gently squeezed. This texture is what creates both the sturdy base and the delightful crisp topping.
- Layer with Precision: Press exactly half of the oat mixture firmly and evenly into the bottom of your prepared pan. Use the bottom of a flat measuring cup or a clean glass to compact it tightly. This creates the essential sturdy crust. Next, evenly spread the strawberry mixture over the pressed crust. Finally, sprinkle the remaining oat mixture over the strawberries, ensuring an even layer for a beautiful golden topping.
- Bake to Golden Perfection: Bake for 40-50 minutes, or until the topping is golden brown and the strawberry filling is visibly bubbling around the edges. If you notice the topping browning too quickly, you can loosely tent the pan with foil.
- Cool Completely (Crucial!): This is arguably the most important step for achieving clean, firm bars. Allow the crisp bars to cool completely in the pan on a wire rack for at least 2-3 hours, or even longer. Cooling allows the filling to set and the crust to firm up, making the bars easy to lift and slice without crumbling. Patience truly pays off here!
Beyond the Basic Bar: Variations and Serving Suggestions
While the classic strawberry crisp bars recipe is a masterpiece on its own, its versatility allows for exciting variations and serving ideas, making it a truly essential addition to your summer recipe repertoire. For more inspiration and to truly make this recipe your own, explore our guide: Master Strawberry Crisp Bars: Your Essential Summer Recipe.
Creative Variations:
- Mixed Berry Delight: Swap out half of the strawberries for blueberries, raspberries, or blackberries for a colorful and flavor-packed medley.
- Tropical Twist: Add ¼ cup of shredded unsweetened coconut to the oat crumble mixture for a subtle, exotic hint, as inspired by some tropical crisp variations. A little lime zest in the strawberry filling also brightens the flavor.
- Nutty Crunch: Incorporate ¼ cup of finely chopped pecans or walnuts into the oat crumble for an added layer of crunch and nutty flavor.
- Citrus Zest: A teaspoon of lemon or orange zest in the strawberry filling can dramatically enhance the fruit's brightness and aroma.
- Spiced Crumble: A pinch of cinnamon or cardamom in the oat mixture can add a warm, comforting note, especially as summer transitions to fall.
Serving & Storage Suggestions:
These bars are designed for portability, making them ideal for grab-and-go enjoyment. They are absolutely delicious served at room temperature, straight from your hand.
- For Immediate Indulgence: If serving at home, a dollop of fresh whipped cream or a scoop of vanilla bean ice cream takes them to another level of decadent dessert.
- Make Ahead: Strawberry crisp bars are excellent for making ahead. Store them in an airtight container at room temperature for up to 3 days, or in the refrigerator for up to 5 days.
- Freezing: For longer storage, wrap individual bars tightly in plastic wrap, then place them in a freezer-safe bag or container for up to 2-3 months. Thaw at room temperature or gently warm in the oven for a "freshly baked" experience.
From lively backyard barbecues to quiet afternoon tea, these perfect portable strawberry crisp bars offer a slice of summer comfort in every bite. With their ideal balance of sweet, juicy fruit and buttery, crunchy oats, this strawberry crisp bars recipe is more than just a dessert – it's an invitation to savor the season's best flavors, effortlessly shared with those you love. So go ahead, whip up a batch, and watch them disappear!
